Wondering where and how to install the Satic Pure Power Plug-in Dirty Electricity Filters? Read on! I’ll discuss where to place the filters depending on what you are trying to accomplish.
Installation Instructions—
Satic Pure Power Plug-in Dirty Electricity Filters
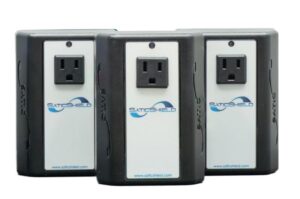
There are four ways the Pure Power Plug-in Dirty Electricity Filters can be used. How and where you plug them in will depend on what you are trying to do. Here are four ways the filters are typically used:
1. To clean dirty electricity from a particular source in the home. Examples of things you might want to clean up:
•Computers, TVs, and other electronics, including chargers.
•Refrigerators, dehumidifiers, and ranges (including gas stoves that nonetheless plug into an outlet to operate the controls)
•Circuits that include dimmer switches or LED, CFL, or fluorescent lights
2. As stand-alone units to lower overall dirty electricity (DE) levels in the home.
3. To supplement the whole-house filter where DE levels are so high that even a 90% reduction in levels doesn’t get your levels below 50 mV (millivolts).
4. To lower levels on a specific circuit.
How to plug in the filters in each case is discussed below.
Installing to Clean up a Particular Source
Simply plug the filter into an outlet or power strip. You can then plug the computer, fridge, or whatever directly into the filter or you can plug it in to the outlet above or below where you have the filter.
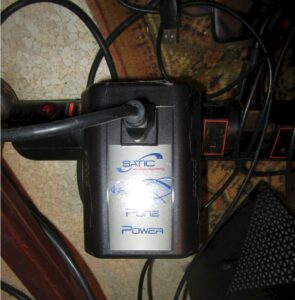
For example, this Pure Power plug-in is being used to filter dirty electricity from a hardwired desktop computer. The computer is plugged directly into the filter and the filter plugged into the power strip. I have found that doing it this way lowers the dirty electricity inside the computer itself and prevents it from traveling along the cables to your keyboard, mouse, and monitor.
Lowering Dirty Electricity Levels
Throughout the Home
Typically, you will get the best filtering throughout the home by plugging the filters into the outlets closest to your circuit panel (breaker box). There’s a specific way you have to do this. Let me explain:
Every circuit in your home is either a Phase A circuit or a Phase B circuit. What does that mean? Well, in the United States, Canada, and all other countries with 120-volt power, the 240 volt cable coming in from the power line splits into two 120-volt phases (also called legs). When you look at your circuit panel, you will see (usually) two columns of breakers. The columns don’t matter. What matters is that the first breaker in every column is called “Phase A.” The second is called “Phase B,” the third is called “Phase A,” the fourth “Phase B.” So what you have is an A-B, A-B cascade.
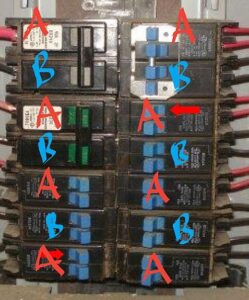
You need to filter both phases of electricity, so you need to install at least one plug-in filter on a Phase A circuit and at least one on a Phase B circuit. The plug-ins work such that with a small enough home, you can filter the entire home with just 2 filters.
For example, in the image above, let’s say you want to install one filter on the first breaker in the second column. That’s a Phase A breaker. Therefore, your second filter must be installed on a Phase B breaker. You can install it on any of the Phase B breakers. It doesn’t matter which column, and it doesn’t matter how far up or down the column it is. But as I noted above, typically you will get the best filtering if you can install both filters on the outlets that are closest distance-wise to the breaker box.
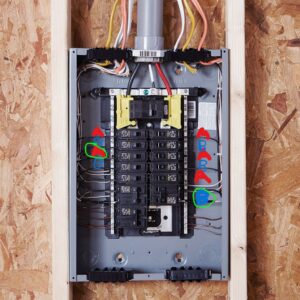
Here is another example (usually you will see your circuit panel with the cover on it; here you can see the wiring; you don’t need to take the cover off to figure out what Phase A and B circuits are). In this example, let’s say the Phase A outlet closest to the circle panel is the one circled in green. You’ll install a filter there. Then you need to put a filter in a Phase B outlet. Let’s say that the Phase B outlet closest to the circuit panel is the one circled in green. You’ll add a filter to that outlet.
It’s best to have a dirty electricity meter to measure the reduction you get. This way, you can experiment with putting the filters in different places to see what brings you the greatest reduction throughout your home and/or on the circuits you are particularly concerned about. Sometimes it’s not the outlet closest to the breaker box that gives you the greatest reduction.
You can buy the SaticShield Line EMI Meter from me or you can rent a meter from me for just $21 for a week (send me an email at SmartMeterEducationNetwork@gmail.com or call me at 520-398-2985).
Supplementing the Whole-House Filter
When you still have levels higher than 50 millivolts after installing the whole-house filter and you want to bring the levels down throughout your home, then it’s best to follow the protocol in #2, above.
Lowering Levels on a Particular Circuit
You might want to just remediate one or two circuits in your home or apartment or office. Or, you might have purchased the whole-house filter and find that you have a particular circuit (or circuits) that won’t go down due to a wiring error or to something plugged in on that circuit. If it’s a wiring error, it’s best to track it down and get it fixed, but if you can’t do that then you can pop a plug-in filter into an outlet on that circuit and bring your levels down that way.